

Rainbow Salt Tray is a fun and inviting pre-writing activity.
Why would you need crayons, textas, pencils and paper to draw when you can have more fun with a Rainbow Salt Tray! Draw pictures, create patterns and practise writing your name with this simple to make Rainbow Salt Tray. The greatest thing about a Rainbow Salt Tray is that it is cheap to set up, educational, you will find all the items around the home and it will entertain the littlies for hours!
A Rainbow Salt Tray is a great activity for kids of all ages, my 22 month old had a go and my 6 year old also had a play. I just adapted and encouraged some ideas for them to try as they played.
What you will need?


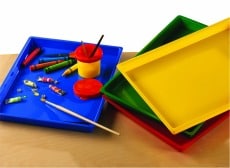
You will need 5 basic things to create your very own Rainbow Salt Tray: about 100g cooking salt, sticky tape, coloured paper, a tray (see below for some ideas) and a paint brush.
- Cut the paper to fit and cover the base of the tray in order of the colours of a rainbow.
- Place sticky tape over the joins of the paper to avoid the salt moving underneath the coloured paper.
- Cover the paper lightly with salt.
Tip: Only a small amount of salt is required for this activity as too much can make it harder to see the drawings. You can also make your tray any colour you would like, possibly your child’s favourite colour, whatever motivates or interests them!
Some ideas to use for a tray:
- The lid to a plastic tub or container.
- A cardboard box with the side cut down to size if needed.
- A medium to large plastic container that has low sides.
Let’s Play
There are SO MANY things you can do with a Rainbow Salt Tray – here are a few ideas to try!


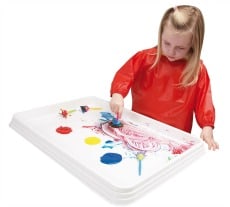
The Rainbow Salt Tray is a great activity for Miss 4 to practise writing her name and for Miss 22 months exploring the cause and effect of what happens when using the paint brush in the salt. I think the look on her face says it all – FUN!
The Rainbow Salt Tray is a fabulous motivator to get kids who need that extra support to learn how to write their names. The fun is watching the colours come through when writing and drawing in the salt.
Let’s Learn


Miss 4 loves her numbers at the moment but is reluctant to try and write the ‘more difficult’ shape numbers such as 2 and 5. She was more willing to have a go in the salt tray because she could so easily shake the tray and try again! I also lightly formed their shaped in the salt for her to copy and trace over.
Miss 6 practising her current sight words, no boring paper and pencils here!
Let’s Explore


The Rainbow Salt Tray is great for encouraging creativity, with the freedom to make patterns and pictures.


Shake it and start again! Hours of fun!!
Learning benefits of playing with a Rainbow Salt Tray:
- Creativity
- Fine Motor Development – Pre-writing skills
- Hand-Eye Coordination
- Cause and Effect
- Spatial awareness – experimenting with shape and space
Available in our Learning 4 Kids Shop
Please click on the images to view products.


Hi
Pretty amazing
I can’t wait to try it out with children
Sue
I absolutely love this idea. Mainly because it is a new idea to me, and I never would have thought of it myself.
I would love to know what you use for your tray. It looks perfect?
That’s so clever and really beautiful. I’m definitely going to give this a go.
Thought you’d like to know I’ve featured this on the Sunday Showcase. Here is the link so you can take a look. http://www.herecomethegirlsblog.com/2012/06/23/sunday-showcase.html
Oh, that is awesome! Thanks for featuring us, I am heading over now to take a look! Thanks again! 🙂
Oh, Janice. This is deliciously awesome! I can’t wait to try this!! Pinning now so I remember to do it in the fall!
The dollar stores have the throwaway aluminum pans that I think would work as the tray?
Great idea – can’t wait to try with my 2 1/2 year old grandson – short attention span!
i have never thought about using paintbrushes, preferring the children to use their fingers for that added sensory experience!!
I was inspired by your Rainbow Salt Tray. I just wrote a blog on all the communication actvities you can do with it. Just thought I’d share with you in case you wanted to check it out! Great idea by the way!!!! http://communicationstationspeechtx.blogspot.com/2012/08/12-communication-activities-to-do-with.html
Are you a Montessori teacher? This is so much inline with the Montessori method! If you are not, you ought to look into it!
Wow… I just LOVE this idea for my 2.4year old and can’t wait to try this with her tomorrow. Love love love. Thanks!
Thanks Jude, have fun with it and be sure to share some pics with us! 🙂
I just love all the great ideas on this site, thank you!
I’ve featured this activity in my latest Craftulate blog post on Larder Crafts for Toddlers. You’re welcome to see it here http://craftulate.blogspot.com/2013/02/30-larder-crafts-for-toddlers.html – please grab a Featured Button if you’d like to. Thanks for the inspiration!
This is so simple. Yet so fun. Thanks for sharing! xx
This is such a smart and beautiful idea!! My daughter loves rainbow art, and has been using rainbow markers!! She would love this tray!! Thank you for sharing it:)
Excelente actividad. Me encanta. Gracias.
thank you for such wonderful ideas , the simplest things are highly educating.
fate brougt me here :)) lots of great ideas, but definitely gonna try this one first wih my 2.5 ds. Thanks!
hi, stumbled my way to your site and found lots of great ideas, but definitely gonna try this one first with my 2.5 ds. Thanks!
Hi just tried the salt try. Added some edible coloring / non toxic washable paint paste to make it colorful.
So excited! I just made this, but I used contact paper (from the dollar store), instead of taping the edges, to cover the whole thing! It looks great, and I think it will increase the longevity of use even more! 🙂 We are going to use this at our learning themed play group! Thanks for sharing!
Fantastic idea.. Did for my 2 year old son and he loved playing with it.. Thanks so much ..
Hi Anisha, I am so thrilled it was a hit with your 2 year old. Janice x
I love the tray, I had a hard time getting the paper to stay.. I got 2 clear plastic trays at the dollar store, purchased a pack of colored sharpies, made stripes with markers and painted the bottom of the tray with white paint. I couldn’t find white trays.. My 5 year old grand has played for hours..Hopefully her sister that is struggling in kindergarten will love hers as well.. Thank you for the idea, I think it will help so much.
Love the salt tray activity 😍
Excited to learn activities for my grandkids 😄
thank you for sharing this great idea
Love this idea I’m going to o make this and laminate so we can play with it throughout the school year. Use it for color sorting etc as well.