
Letter Sounds Cut, Sort and Paste Printable Activity allows children to apply their letter sound knowledge to create words phonetically and then to apply these words to sentences. It provides children with the opportunity to practice the segmentation and blending of simple decodable words, phonemic awareness skills and support phoneme-grapheme mapping.
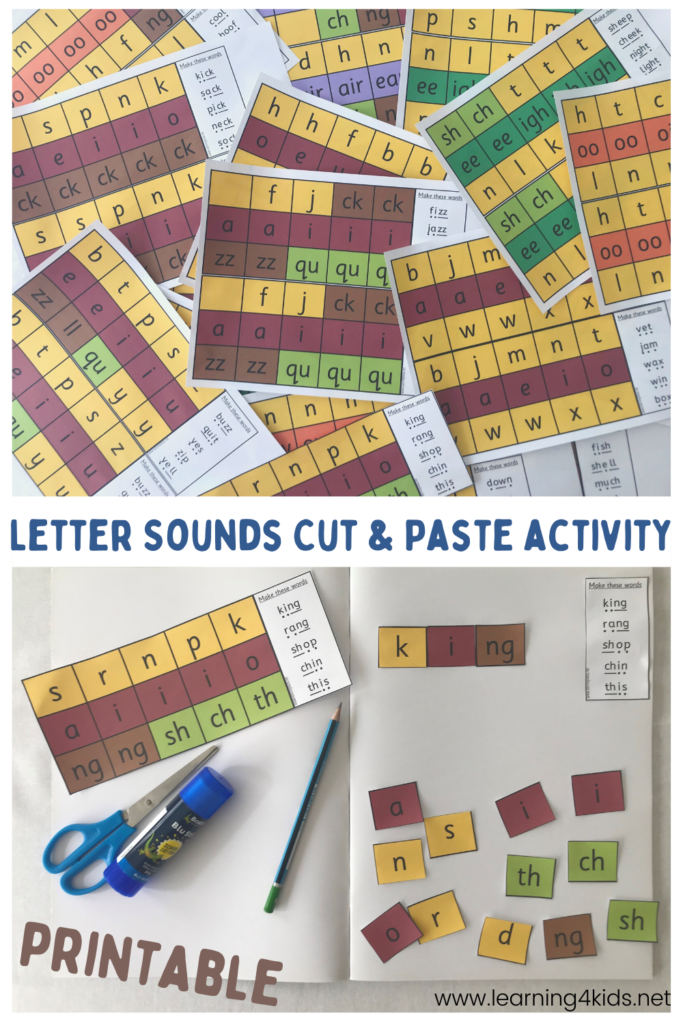
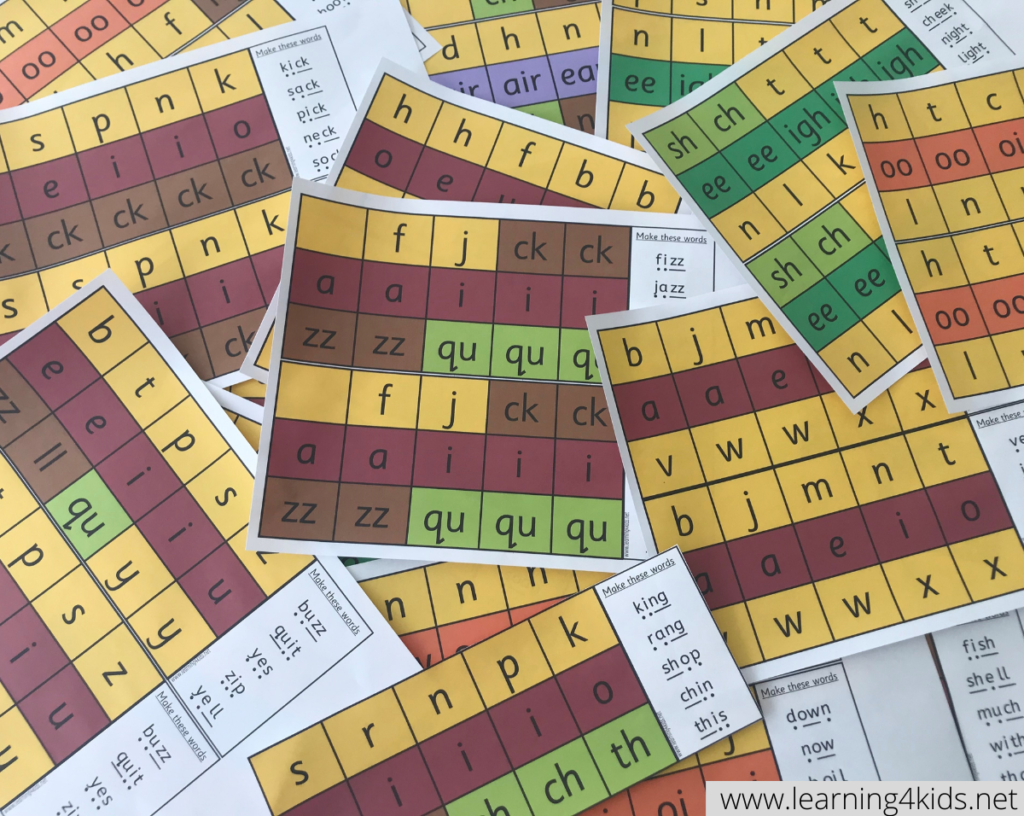
The Letter Sounds Cut, Sort and Paste is a printable bundle that follows the progression of the Letters and Sounds Systematic Phonics Program and covers Phase 2 and Phase 3 sounds (see below progression in Set 1-12). It follows the suggested order for teaching letters and sounds and provides a selection of suitable words made up of these letters as they are learned.
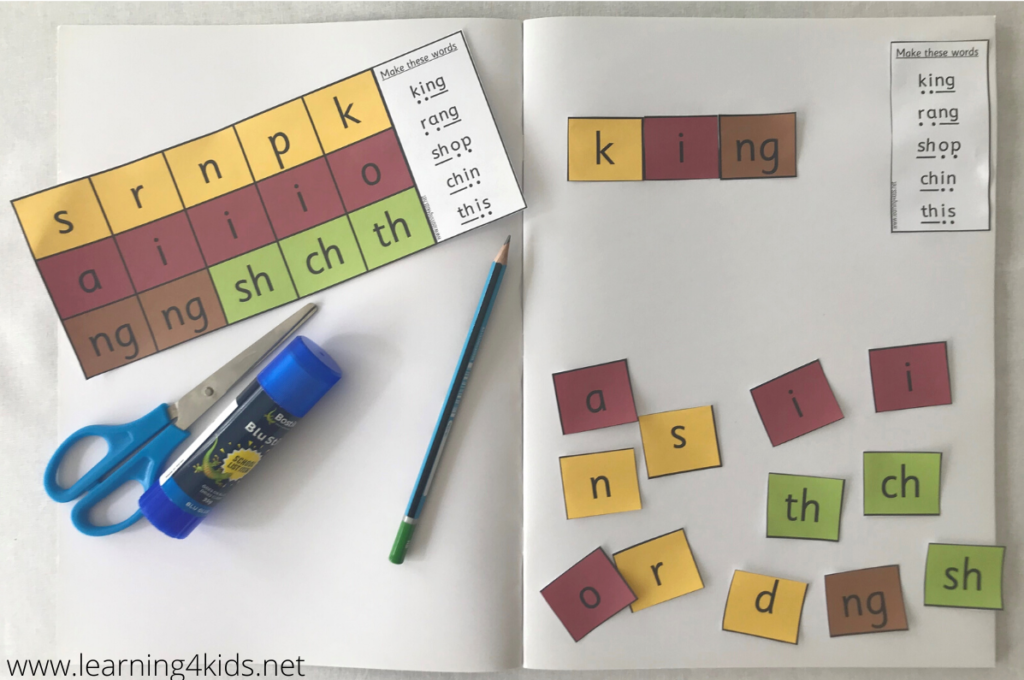
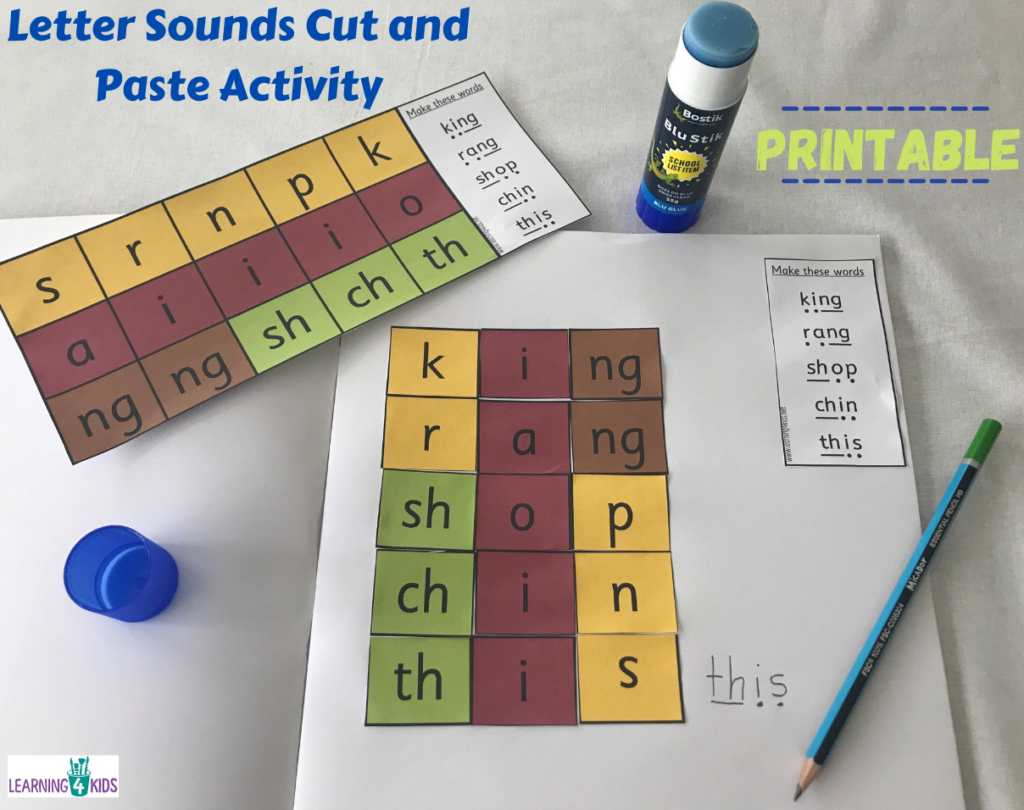
Once the letter squares are cut out, they become a letter tile for manipulating and creating words. Children will sound out the word on their word list, locate the letter tile that makes that sound and blend (glue) the letter tiles side-by-side to create the word (blend). Children may draw a picture to match the word and write a sentence using the word (depending on ability).
A fantastic article on Orthographic Mapping can be found here: Orthographic Mapping, How We Learn to Read So Fast
What you will need?
You will need a phonics scrapbook (or paper), scissors, glue, writing pencil, coloured pencils and Printable Letter Sound Cut and Sort Bundle. Each sheet has 2 grids that can be shared between 2 children.
The letter tiles are colour coded: vowels (red), consonants (yellow), digraphs (light green), double consonants (brown), vowel phonemes that make one main sound (dark green), controlled r vowel sounds (purple) and vowel phonemes that make two sounds (orange).
The Printable Letter Sound Cut and Sort Bundle also comes with a black and white option for printing. The letter tiles are left white, and children can colour in the letter tiles.
Let’s Play
Prior to completing this activity, each set of sounds need to be taught explicitly and provide children many opportunities to form these sounds, saying the sounds orally, identifying words beginning with this sound, locating the letter (grapheme) that makes this sound within words/sentences. Using individual mini whiteboards is a great way to practice segmenting and blending these words, applying phoneme (sound) to grapheme (letter) correspondence. It is important to provide children with scaffolding if required, such as draw 3 lines for each sound for the child to write on.
Some Ideas:
- Provide each child with a set of letter sounds tiles and word list. Following with their finger, children point to each letter and say the sound. Play a game: put your finger on the letter that makes the ‘s’ sound, now the ‘m’ sound. Check your partner’s answer, are they correct?
- Orally segment and blend the words on the list. Students can use their arm to support this. Tap shoulder (first sound), elbow (middle sound) and hand (final sound). Then run your hand across shoulder, elbow and hand to blend to make the word. s – a – t = sat What was the middle sound? ‘a’ draw the sound ‘a’ in the air. What was the beginning sound? This can be repeated for final and middle sounds in the word.
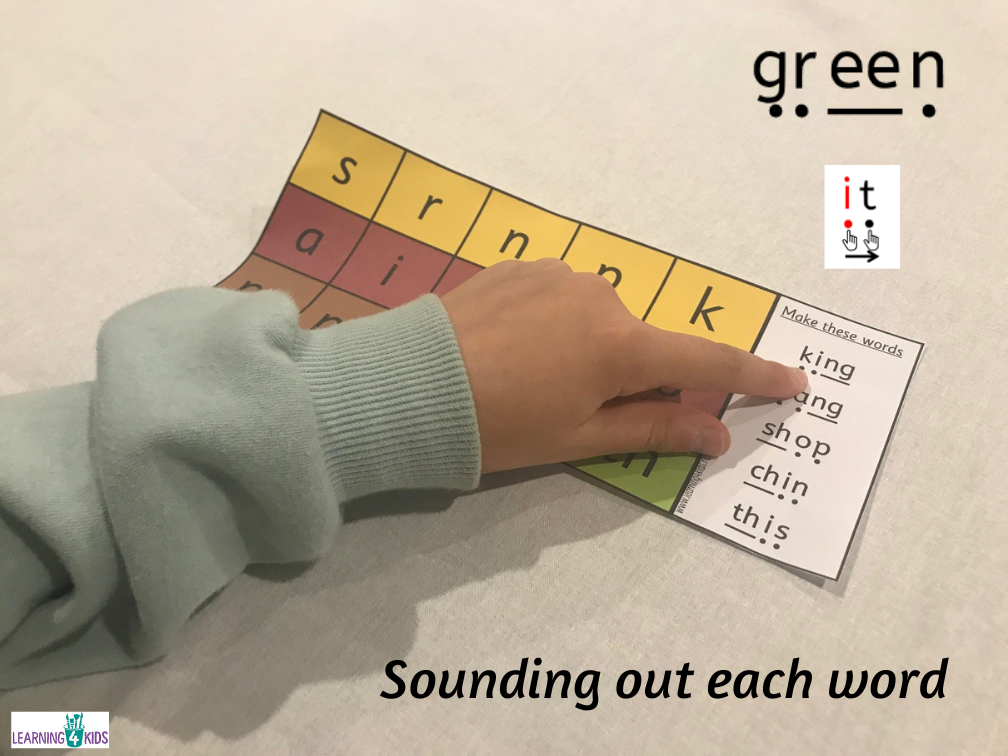
- Each of the word lists have sound buttons or are underlined for one sound such a ch. Ask children to follow with their finger across the sound buttons to sound out each sound and then blend the whole word. Point and follow the sounds all the way through the word.
- Play with the words on the list (phoneme manipulation). What will happen if we change the first sound in king, ‘k’ to a ‘r’? Ring! What would happen if we changed the ‘i’ in ring to an ‘a’? Rang! Children really enjoy doing phoneme manipulation on mini whiteboards too.
- Read the word list to a partner, read it like a robot, read it with a whisper voice.
Let’s Learn
Once students have completed all these oral activities using the template, they can then move onto cutting, sorting and gluing the words into their scrapbooks.
- Children cut out all letter tiles and the word list and lay them out so that all letter tiles can be seen. Glue the word list onto the corner of the page. Children can then refer to this list as they create their words. As children complete this activty, ask questions like “what word are you making now?” “Which letter/sound are you trying to find?”
- Point to the first word and sound it all the way through. Find the letters and glue them side by side onto the paper or scrap book. Follow and repeat this until all words have been made and are glued into the scrap book.
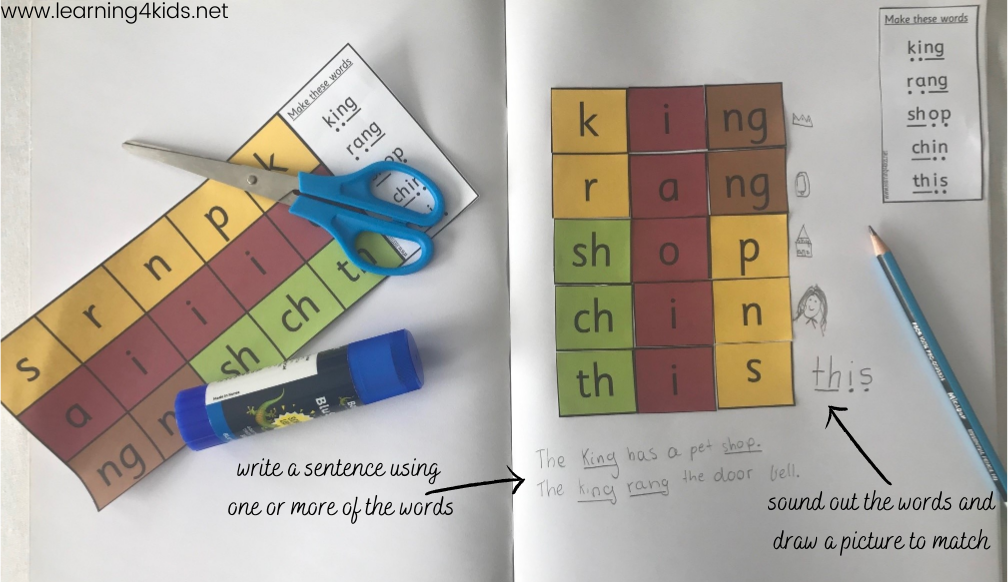
- Once all words are glued down, children then check their words by sounding out and may draw a picture next to the word. For example, if the word was k-i-ng, draw a king next to the word or something that represents a king. If the word is too tricky for a picture such as the word th-i-s, ask the child to write the word next to the glued on letter tiles.
- Once all the words have been checked and a picture has been drawn next to the word, children may select one or two words and put them into a sentence.
- Sit with a partner and sound out your words and read your sentences or select 2 or 3 students to share their work with the class.
Learning Opportunities
The Letter Sounds activity supports children in their journey of learning to read. It provides an opportunity for children to practice their phonemic awareness, that spoken words are made up of individual sounds and then make links between the sounds and the letters. It allows children to practice, hearing sounds within words, letter-sounds correspondence and make sound links to letters in simple words (phoneme-grapheme mapping).
Other learning benefits:
- Great for consolidating new and previously learnt letters and sounds.
- Applying letters and sounds knowledge to create CVC words (and sentences).
- Explicit learning of letter sounds and letter names. (Sounds to be taught first)
- Practise oral blending, segmenting, reading and spelling words with new and previously taught letters and sounds.
- Manipulating letters tiles, orally sound out and blend to create words.
- Phonemic segmentation ability, letter sound correspondence
- Phoneme -grapheme mapping (orthographic mapping)
- Coordination: Hands-on manipulative tool
- Fine motor development: cutting, sorting and gluing.
Available in Learning 4 Kids Online Shop
Available here: Letter Sounds Cut, Sort and Paste Printable Activity
The Letters Sounds Cut, Sort and Paste Printable Activity comes in a bundle consisting of 23 documents. It follows the Phase 2 and Phase 3 Letters and Sounds phonics program. The printable includes both colour and black and white options for printing.
23 documents – Phase 2 and Phase 3 of Letters and Sounds
Set 1: s a t p – Set 2: i n m d – Set 3: g o c k – Set 4: ck e u r – Set 4a: ck – Set 5: h b f,ff l,ll ss – Set 5a: ff ll ss
Set 6: j v w x – Set 7: y z,zz qu – Set 7a: zz qu – Set 8: ch sh th ng – Set 8a: ch sh th – Set 9: ai ee igh oa – Set 9a: ai oa – Set 9b: ee igh
Set 10: oi ow oo(long) oo (short) – Set 10a: long and short oo – Set 10b: oi ow – Set 11: ar air ear – Set 11a: air – Set 12: er ur or ure – Set 12a: or ur – Instructions


Very good idea
Thank you, Huma. I am so glad you liked the activity.
I’m excited about this activity for reinforcing letter sounds! The emphasis on segmentation and blending of simple decodable words is exactly what many kids need.