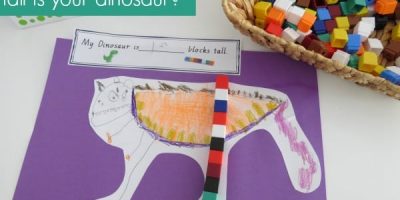
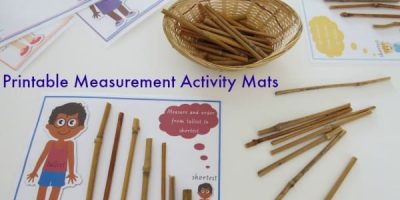
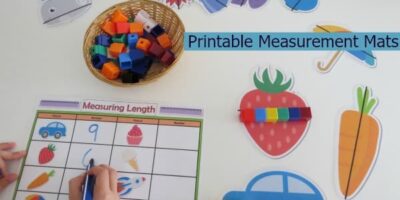
A Box Jam Packed Full of Fun and Learning

This is a sponsored post.
Spielgaben 1


SPIELGABEN EDUCATIONAL TOY KITS
This FABULOUS new toy I have had the pleasure in trying out is just that- an AMAZING box jam packed full of fun and learning.  I cannot even begin to tell you how incredible the SPIELGABEN TOY-BASED EDUCATIONAL SETS are.  There is so much to be explored and discovered with this beautifully wooden crafted educational toy.  This post barely touches the surface of the potential these 13 box sets bring!
 
I love the way that the Spielgaben Educational Toy Sets promote learning through play and encourages open-ended and creative learning opportunities.  The items included in the sets are intriguing and unique and will ignite the natural curiosity to learn within kids as it did with my kids.  Miss 7, Miss 5 and Miss 2 (nearly 3)’s eyes lit up when they first saw the Spielgaben Toy Sets and could not wait to have a play. 
 
WHAT IS A SPIELGABEN EDUCATIONAL KIT?
Spielgaben  2


The Spielgaben Educational Toy Kit consists of 13 beautiful high quality wooden play sets which are stored in one large wooden trolley box with wheels.  The above photo shows 11 of the 13 wooden sets more closely.   It is specially designed for children between 3 and 12 years old and is the perfect toy that will grow with your child’s development and learning needs. 
Each 13 boxes can be played with individually or combined with another, you will find colourful cotton balls, construction blocks which have been designed in a range of shapes and sizes for specific purposes.  Other sets include three-dimensional solid shapes which can also be used for threading, there are concentric rings, 7 colourful different geometric shaped tablets and different length coloured sticks.   
User Guide Image 3
The Spielgaben Kits come with 4 User Guides to help you get the most from the Spielgaben sets.  These user guides are AMAZING, the information provided and activity ideas are so easy to follow and the best part is that there are photos and explanatory notes too.


A BRIEF BACKGROUND ABOUT SPEILGABEN: What makes it so special?
The original inventor of this toy is a German educator Friedrich Froebel (1782 – 1852) who believed that all children were creative and that they could learn art, design structure, and Math by discovering these elements in nature. This method of learning became the basis of Kindergarten and the Montessori style of holistic learning and is utilised around the world.
 
WE HAVE HAD A PLAY WITH THE SPIELGABEN EDUCATIONAL TOY SET!
Let's Play Image 4 


All these Spielgaben activity box sets are presented with limitless opportunities for hands-on and open-ended play and learning within the areas of science, mathematics, literacy and creative play.   There are ENDLESS learning opportunities to be explored and discovered with the Spielgaben Educational Toy Set.  I can only brush the surface of the possibilities and the potential these products bring and therefore have chosen to share how we played with 2 of the 13 toy kits. 
Here is just a sample of what we did….
 
COTTON BALLS SET
Cotton Balls Collage 5


One of the first items Miss 2 and I were instantly attracted to was the 12 Cotton Balls Set.  They are bright, beautifully textured and make a wonderful sensory toy.  They are the kind of toy that you just can’t help but to give them a little squish. 
There are endless learning opportunities to be explored and discovered with the 12 Coloured Cotton Balls such as active play with throwing, rolling and catching and mathematics with counting,  creating patterns, matching and sorting colours. 
Miss 2 has been learning about colours and I thought that the cotton balls would be a great tool for continuing this learning.  We played a few games such as Hide and Seek, Hidden Ball under a Cup and Throwing Balls into a Box. 
 
Hide and Seek:  Miss 2 absolutely loves to play the game Hide and Seek and it is great for reinforcing skills such as following directions, recall of naming colours
I placed the balls that were on a string in easy to find places so that they would be instantly seen when she walked into the room.  When Miss 2 found a ball, she would call out the colour and then place it around her neck like a necklace and then went onto find another. 
 
Hidden Balls under a Cup:  This game can be played in a number of ways and is great for building concentration, recall and memory.  I placed all of the balls underneath the cups and Miss 2 lifted the cups, said the name of the colour and then balanced the ball on top of the cup.  It can also be played by covering only 1 of the 6 coloured balls and the child needs to guess which colour is missing and has been covered.
 
Throwing Balls:  We used the Coloured Cotton Balls for a throwing game.  It is a great way to exercise and develop gross motor skills and hand-eye coordination.  We used the wooden storage trolley as the catchment box; it is the perfect size, nice and big for not so accurate throwing abilities.  Miss 2 had so much fun throwing them in and missing the box but it was also great for her to learn her colours as she called them out each time she threw them. 
 
There are lots of great ideas in the guides that I have never even thought of before such as a Fishing game which involves placing a paper clip through a hoop on the cotton balls and catching them with a magnet placed on the end of a rope (fishing rod).
 
COLOURED RINGS SET
Coloured Rings Collage 6


We had so much fun playing with the Coloured Rings Set which comes with a range of shapes and sizes of rings and half rings.  They are brightly coloured and my girls were instantly drawn to them.
The Spielgaben Toy Sets are so diverse and encourage open-ended activities and creative play that other items found around the home can also be added, enriching the learning experience.  We included pompoms into one of our activities as it was a great match for the colours and shapes of the Coloured Rings Set.
 
Coloured Pompom Sort:  We used the larger and smaller coloured rings in this set to form the coloured sorting barriers for placing matching coloured pompoms into.  The aim of the activity was to match the larger coloured pompoms to the larger circles and the smaller pompoms to match the smaller circles. The pompoms also needed to match the same colour of the circles.  I also introduced a set of mini tongs to encourage fine motor strengthening and coordination.  It is a great way to reinforce the learning of colours, and spatial awareness of larger and smaller.  The Geometry Dots Set can also be used for this sorting colours activity as the colours all match in the full sets.
 
Creating Pictures and Faces:  Experimenting with spatial awareness and shape to create pictures and faces.  The activity involves the process of trial and error, experimenting with what works and what doesn’t and finding another way to create the desired result.  The Coloured Rings Set along with a combination of the other sets in the kit can also be used to create names and words.
 
A bit of fun with pretend play: The Spielgaben Educational Toy Sets encourage creative play.  Miss 2 could not help but use two rings to form a pair of glasses.  She put on a silly voice and pretended to be another character.  Pretend play is great for language development, creativity and the imagination.
 
There are lots of great play ideas to be found in the user guide for the Coloured Ring Set.  They are great for encouraging learning about fractions, spatial awareness, shape, creativity, the imagination and pretend play.
 
EDUCATIONAL BENEFITS
Educational Benefits 7


As a Primary School Teacher I value toys that are educational and offer a large range of hands-on learning opportunities, that promote critical thinking, problem solving and creativity, and most importantly will be fun!  The Spielgaben Wooden Educational Toy Sets are a quality educational toy that fulfils these important qualities.  It encourages children to think critically, explore, engage, challenge, experiment, discover and play while covering a range of learning areas and subjects.
I believe that these beautifully crafted wooden educational toy sets will enhance children’s natural gifts and provide many educational benefits such as:
  • Construction: balancing, stacking, spatial awareness
  • Mathematics:  numeracy, fractions, measurement, patterns, shapes, spatial awareness, mathematical thinking, geometric principles
  • Science: balancing, solids, scientific thinking
  • Imaginative Play: boost creativity and creative thinking
  • Problem Solving
  • Trial and Error: exploring strategies
  • Cause and effect
  • Promote active play
  • Sensory – texture, hands-on
  • Fine and Gross Motor skills and development
  • Coordination
  • Concentration and memory skills
  • Communication and language development: encourages interactions
  • Self-esteem: sense of pride and achievement
LINKS
Trolley Image 8


If you would like to get your hands on the quality Spielgaben Educational Box set jam packed full of fun and learning, they are available in Australia for an amazing introductory price which you can view <HERE> (Offer ends 4th June 2013).
It will be available in the US on Amazon later this year and also in the UK early next year, so keep an eye for when it comes available. 
  • Visit the Spielgaben website for more information and watch a video about the Spielgaben Educational Toy Kit.
{Disclosure: This is a sponsored post for Spielgaben. We were given a set of Spielgaben toys. I was not compensated in any other way for this post. The opinions expressed are purely my own and those of my children.} 
 
Learning 4 kids

Learning Colours – Orange

Learning Orange Activities


Come play with the colour ORANGE!
As part of our Learning Colours Series here on learning4kids, today I am sharing with you some of the activities we have been doing as we explore and play with the colour ORANGE.  Our ‘orange activities’ involved reading The Big Orange Splot followed by some ‘splot’ painting, also playing with orange water beads, orange play dough and making a orange sensory ice box.  
By completing all these activities we are not only learning about the colour orange but we are also promoting other learning, development and skills building. 
 
If you have only just joined our Learning Colours Series here on learning4kids and would like to find out more, click here
 
ORANGE SPLOT PAINTING
Orange activities for preschoolers


A fun and simple activity which involves reading the story The Big Orange Splot by Daniel Manus Pinkwater followed by making orange paint ‘splots’ with oranges cut in half pressed into paint.   Books are a great way to introduce new ideas and concepts and this story is perfect for introducing the colour orange. 
I set up our activity table with newspaper and placed 2 orange cut in half faced down onto an orange paint tray.  Kids will love to create their own ‘splots’ with paint and cut oranges on paper!
 
ORANGE SCENTED PLAY DOUGH
Orange Scented Play Dough1


Making Orange Scented Play Dough is a great way to create a fun sensory learning experience that promotes fine motor development, creativity and learning the colour orange.  We have used this play dough before in a previous activity with Number Play Dough Mats.
Click here to view and print Orange Scented Play Dough Recipe
Click here to view the full activity Number Play Dough Mats and print your FREE Number Play Dough Mats.
 
ORANGE ICE CUBE SENSORY BOX
Orange Ice Box 1


Another orange activity Miss 2 had fun playing with was an Orange Ice Sensory Box.  I filled a jug of water and added a few drops of orange food colouring and then filled a range of different shape containers, some small and some larger ones.  I placed the containers onto a tray and into the freezer.  When frozen the colour appears to be a more pale orange. 
To make the ice sensory box a little more fun we added a small amount of bright orange water (food colouring) to the box, a pair of tongs and different orange objects to create an invitation to play in an unstructured and creative way.  I added the tongs to encourage Miss 2 to pick up the ice blocks.
We also have a Blue Artic Ice World here on Learning4kids.
 
ORANGE WATER BEADS
Orange Water Beads 1


I absolutely love water beads, so when I found these orange ones I thought it would be perfect for our learning the colour orange activities.  On our activity table I laid out a bowl of orange water beads, an orange spoon and orange cupcake pans.  Miss 2 spent hours picking up the water beads with the orange spoon and placing them into the cupcake holders.
 
OTHER ORANGE ACTIVITY IDEAS
  1. Threading Beads:  Threading ORANGE beads onto ORANGE pipe cleaners.
  2. Wear ORANGE for a day:  Dress your child and/or yourself wearing the colour orange for the day.  Where your favourite green scarf or socks.
  3. ORANGE Discovery Box:  Go on a ‘orange treasure hunt’ around the house with a box and fill it with as many orange things as you can find.  You can involve your child or make the discovery box for your child to explore. A box filled with so many ‘orange’ treasures to pull out to touch and feel, smell, listen to, look at and explore. 
  4. Make an ORANGE morning tea: Cut up a range of orange foods such as carrots, melon and oranges for morning tea.
  5. Sing Songs about the colour ORANGE: You can basically take any song and replace some words with the colour green.  Why not make up your own song or chant with the word orange?
  6. ORANGE Bath:  Fill the bath with water and add a few drops of orange food colouring and orange balloons filled with water.  Adding bubbles makes it even more fun!
Click on the links to see our other Colour Activities from our Learning Colours Series
RED
YELLOW
BLUE
PINK
GREEN
Learning 4 kids

Valentine’s Day Activities for Kids

Valentines Day Activities for Kids


With Valentine’s Day just around the corner, I thought I would collate all the activities we have done so far here on learning4kids.
 
STRAWBERRY SCENTED VALENTINE’S DAY PLAY DOUGH
Strawberry Scented Play Dough


To inspire creativity and the imagination set up a hands-on play dough activity with bright red play dough with sugar heart sprinkles and decorative heart shaped tooth picks. Read more…..
 
HEART SHAPED PAPER CHAINS 
Heart Shaped Paper Chains


Heart Shaped Paper Chains are so much fun and super easy to make.  They are a great activity to do with the kids this valentine’s day and use them to decorate their bedroom, play area or classroom with.  Read more…..
 
HEART FLOWERS
Heart Flowers


Making craft heart flowers in a vase is an activity that you could do with the kids to celebrate Valentine’s Day as a special gift to give or a pretty decoration. Read more…..
 
BUBBLE WRAP HEART PAINTING
Bubble Wrap Heart Painting


To keep with the theme of Valentine’s Day why not try this paint printing activity with bubble wrap and red and pink paint.  The bubble wrap is cut into different size heart shapes which are used to create painted heart prints on paper.  The painted artwork makes a perfect gift wrap paper for valentines.  Read more…..
 
HEART TISSUE PAPER WINDOW COLLAGE
Heart Tissue Paper Sticky Contact Collage


Create a Heart Tissue Paper Sticky Contact Collage with cut out heart tissue paper pieces and clear contact attached to a window.  When the sun shines through it shows the different shades of reds and pinks created by overlapping the tissue paper.  Read more…..
 
Eye spy with my little eye…….other FABULOUS Valentine’s Day activities I have found around the web!!
Click on the links to take a look!!
Toilet Paper Roll Heart Stamp by Rust and Sunshine
Lollipop Flowers Valentine’s Day Card by Spoonful
Roller Painting by Artful Child
Homemade Heart Sponges by Learn Create Love
Valentine’s Heart Scented Tied Pillow by De Tout Et De Rien
Musical Hearts by Mom to 2 Posh Lil Divas
 
Learning 4 kids


Simple Homemade Lemonade Recipe

Homemade Lemonade Recipe


When I think of a refreshing summer’s drink, Lemonade is usually one of the first drinks that springs to mind.  So after receiving a bag of lemons from our neighbours recently, we thought we would give making homemade lemonade a try.  This is the Simple Homemade Lemonade Recipe we came up with! 
Involving the kids is a great way of opening up the many learning opportunities that comes with cooking with kids.  The social interactions, processing information, following directions and instructions, problem solving and coordination and so much more!
 
Please note this recipe involves using boiling water, this part of the recipe is to be completed by an adult and as with all cooking activities with kids should be fully supervised.
 
What you will need?
1 Cup of Freshly Squeezed Lemon (Approx. 3 medium lemons)
2 Cups Boiling Water
1 Cup Cold Water
1 ¼ Cups Caster Sugar
Slices of Lemon
Lemonade Recipe


Instructions
  1. Boil the kettle and place sugar into a heat proof container or jug.
  2. Remove and squeeze juice from lemons.
  3. Add boiling water to sugar and stir carefully until all dissolved.
  4. Add cold water and lemon juice to the sugary water mixture.
  5. Refrigerate until cool.
  6. Add slices of lemon and ice.
Benefits of Cooking with Kids


Learning Opportunities
So much learning happens when we cook with kids….
  • Sensory- hands on feeling and manipulating the dough through the senses.
  • Fine motor skills- strengthening little muscles through manipulation and moulding the cookie dough.
  • Hand and eye coordination- watching and doing and coordinating these actions.
  • Language development – cooking is a social activity requiring speaking and listening, also developing vocabulary.
  • Self-esteem- a sense of pride and achievement.
  • Numeracy- measuring quantities.
Download and print the full recipe here:  Printable Simple Homemade Lemonade Recipe
 
Learning 4 kids

Learning Tray – Matching Colours

Learning Tray - Matching Colours


What the Activity Involves?
Matching and Sorting Colours with match sticks is fabulous hands-on fine motor learning tray. 
It is so simple to set up, colourful, engaging and is sure to grab the attention of any child!
The Matching Colours Learning Tray involves the child sorting the different coloured match sticks and matching them to the relevant coloured section on the Styrofoam block.  When a colour match is made, the child gently presses the match stick into the Styrofoam.  It is a repetitive activity that requires concentration, fine motor control and coordination.
 
What you will need?
Sorting Match Sticks


You will need a Styrofoam block, coloured paints and coloured match sticks.
Learning Tray Activity - Sorting Colours


Learning Opportunities
  • Fine motor control
  • Hand and eye coordination
  • Concentration and problem solving
  • Determination and perseverance to accomplish a task
  • Colours and patterns
  • Matching, sorting and classifying
Click on the links to find out more….
What is a learning tray - montessori inspired
 
What is a Learning Tray?
Why Learning Trays?
More Learning Tray Activity Ideas


Learning 4 kids

Getting Organised – Art & Craft Supplies

Getting Organised - Art and Craft


Over the years I have stored our art and craft supplies in many different ways.  We have progressed from having everything squashed into a large box, then onto sorting items into smaller boxes, jars and organising them onto shelving.  I much prefer to have everything on shelves as it is easier to see what we have and am more likely to use them.  It also makes it so much easier to set up and pack away activities.
When organising our art and craft supplies, I wanted to keep it simple and inexpensive.  I have recycled and reused baskets, containers, boxes and jars I have found from around the house.  When you start looking, it is amazing the things you will find that can be very useful to organise, store and tidy up art and craft supplies.
This book shelf is only part of what we have in our collection of art and craft supplies, we also have a play dough toolbox, paint box and recycled household items stored in our study which are used for activities.
 
HOW WE DO IT?
To save space I have set up our craft shelf behind the kids play room door. It is out of the way and leaves more room for playing.
organising art and craft items
Tall Jars:  I store our pipe cleaners and straws in tall jars which are originally meant for spaghetti pasta.  I find this way of storing them takes up the less space than having them in another container or box.
Fabric Boxes: Our fabric boxes are really handy because they can be folded flat when not needed and stored in small spaces. Boxes are great to keep things tidy.  We store all our loose craft items such as balloons, paper plates, cellophane and tissue paper in these boxes. 
Glass Jars: These jars are recycled empty coffee jars that I have collected slowly over the years.  What I really like about these jars is that they are transparent and you can automatically see what is in them.
Baskets:  Baskets come in different sizes, shapes and heights and are always a great way for storing craft items and keeping them neatly together in one place.  Baskets do not have a lid so this also allows for extra room for items without the issue on trying to compress a lid on top.
Plant Pots: These are great for storing some items standing up, such as glue sticks, rulers, scissors, pencils, crayons etc.  They are also easily accessible and kept neat and tidy this way.
Lunch boxes:  Containers with lids or unused lunch boxes are perfect for keeping craft items neatly stored altogether.
 
Washable Labels:  These labels are made from laminated coloured paper which I write on with a white board marker.  I list all our art and craft supplies on these labels that are stored on each shelf and what are inside the boxes.  This helps me to keep a record of what I have, anything new I have added or what I need to replace. As things change I can easily wipe away the labels and re-write on them with a white board marker.
 
MUST HAVES!!
list of art and craft supplies


This photo is just a snippet of some of the art and craft supplies we have stored on our book shelf.  On the very bottom shelf we store some kid’s games and toys such at the Wooden Hammer and Tac Set, puzzles, sight word cards, base ten blocks and dominoes.
Some craft supplies I absolutely love to have that are not listed in the picture are alphabet foam stickers, shape cookie cutters, paint containers, felt, dot stickers, alphabet and number stickers, coloured paper and card, PVC tape, threading beads, mosaic paper squares, large pop sticks, poly string, empty jars, magazines, balloons, hot glue gun, small and large paper plates, envelopes, glitter, crepe paper, cellophane, activity trays, fake flowers, bubble wrap, sponges, rubber bands, plastic cups and spoons, magnets and decorative cutting scissors.
 
GIVEAWAY CRAFT PACK
Giveaway Art and Craft Pack


What is included in the craft giveaway pack?
25 Thick Fluffy Pipe Cleaners, 100 Coloured Pop Sticks, 1000 Coloured Match Sticks, 4 Rolled up Coloured Crepe Paper Streamers, 30 Large Rainbow Colours Pop Sticks, Alphabet Sticker Book (450 Stickers), Assorted Colours and Sizes Pompoms, Bag of assorted Buttons, Large Colourful Feathers, Large Bag of Medium and Smaller Feathers, 3 Packets of Cellophane, Alphabet Foam Stickers, Foam Stars and Moons Stickers, Assorted Colourful Foam Shapes, Bottle Tops, 5 Glitter Glue Pens and Craft Paper Cut Outs.
 
To enter this competition all you need to do is:
1.         Subscribe to Learning4kids by email:  <Click here>
2.         Answer the Question in the comment section – What is your most favourite art or craft item and why?
 
Terms and Conditions:
  • Sorry this giveaway is open to Australian Residents only.
  • Competition starts Tuesday 22nd January 2013 and ends 6pm (WA Time) Tuesday 4th February 2013
  • The winner will be chosen using a random number generator at www.random.org and will be notified by email.
  • If a winner has not made contact within 48 hours, a new winner will be selected.
Good luck and I look forward to reading your responses!!
Learning 4 kids

Learning About Shapes with Play Dough

Learning shapes with play dough


Play Dough is such a fun learning tool to play with and explore new concepts. 
With Miss 2 learning about shapes at the moment, I thought it would be fun for her to play and discover shapes using play dough.  The ideas and possibilities are endless! 
I absolutely love the way this invitation to play with play dough and shapes created so many opportunities to learn and play creatively, imaginatively, mathematically, to construct, problem solve, explore, discover and try new things, all while having fun!!  
What you will need?
Shapes Play Dough 2


You will need play dough, shape cookie cutters, rolling pins and shape buttons.  I set these items out onto a tray for my kids to create, explore and discover freely with.
The play dough I used for this activity is a Zesty Lemon Scented Play Dough, you can find the recipe {HERE}
 
Let’s Play
Let's Play with Shapes and Play Dough


One way my girls utilised the materials was by creating an imaginative play cookie shop.  They used the shape cutters, shape buttons and play dough and turned them into shape cookies and had lots of fun decorating them.  My girls were presenting them onto the tray for selling in their cookie shop.  You can see some ordering, classifying and matching of colours and shapes in the photos.
 
Let’s Learn
Let's Learn with play dough and shapes


There was so much creativity and learning happening as my girls explored and tried new things. 
The cut out play dough shapes created a bit of a puzzle which was matched with a play dough button.  Miss 2 placed play dough shapes together to make a 2D house shape and also snowman. 
As my girls were playing along they stumbled upon a problem where we had a diamond shape cookie cutter but did not have a diamond shape button to match.  It was discovered that by putting two triangles together makes a diamond shape.
Exploring and constructing with shape


We left our play dough tools out for about a week and my kids returned to play with the shape cutters, play dough and shape buttons regularly.  Every time they played they created and discovered new ways of utilising the materials.  Here Miss 5 created a 3-D house using the 2-D shapes.  She discovered that putting other shapes together can support, construct and make new shapes.  Miss 5 also later constructed a 3D rocket ship using the cut out play dough shapes.
 
Learning Opportunities
  • Creativity and imaginative play
  • Fine Motor Development
  • Hand-Eye Coordination and Control
  • Concentration
  • Spatial awareness – experimenting and exploring with shape and space
  • Language development – shape names and communication
  • Classifying, matching and sorting
  • Problem solving and self-correcting
  • Shape recognition
This post is part of our Play Dough Toolbox, click on the links to find out more…..
Play Dough Toolbox Series
What is a Play Dough Toolbox?
Importance of Playing with Play Dough
More Play Dough Activity Ideas
More Shapes Activities


Learning 4 kids


Zesty Lemon Scented Play Dough Recipe

Zesty Lemon Scented Play Dough Recipe


This Zesty Lemon Scented Play Dough has a refreshing and zesty lemon scent which adds to the wonderful sensory experience of playing with play dough.  This recipe was developed from a basic paly dough recipe with added lemon essence.  It will provide hours of fun while tantalising the senses.
 
What you will need?
Zesty Lemon Scented Play Dough Ingredients


1 cup plain flour
1 Tablespoon oil
200ml Water
50ml Lemon Essence
½ cup salt
2 Teaspoons cream of tartar
1 Teaspoon of yellow food colouring
 
How to make it?
  • Pour all dry ingredients, flour, salt and cream of tartar together in a saucepan.
  • Add oil, food colouring, lemon essence and water to dry ingredients.
  • I use a whisk before heating as I find this helps remove lumps and blends the ingredients well.
  • Cook over medium heat constantly stirring until it becomes a thick blob.
  • Then turn out onto a clean surface and knead into a smooth blob.
  • Allow the play dough to cool before playing with it.
  • Store in a plastic zip lock bag or air tight container. 
Tip: If the play dough turns out a little sticky, sprinkle a small amount of plain flour onto the bench and knead until smooth and combined.
 
Click here to download and print : Printable Zesty Lemon Scented Play Dough Recipe
 
Activities using the Zesty Lemon Scented Play Dough Recipe: Learning About Shapes with Play Dough
 
Jelly Play Dough Recipe
More Play Dough Recipes


Learning 4 kids

Science Fun – Dancing Sultanas

Science Fun DAncing Sultanas


What will happen if we placed sultanas into a glass of soda water?  Watch and be amazed!!!
 
Dancing Sultanas is a super easy and fun science activity for kids!  It is so simple to set up and only requires basic materials.
 
What you will need?
Dancing Sultanas Science Experiment


You will need a glass of soda water (sparkling fizzy water), about five sultanas and food colouring is optional.
 
Let’s Play
Dancing Sultanas Science


We poured some soda water into a small glass bottle and dropped the sultanas into the fizzy liquid.  The colouring is optional.
 
Let’s Learn
Dancing Sultanas Science 2


The soda in the water creates the fizz and bubbles.  Soon the bubbles start to pick up the sultanas and carry them to the top of the glass.  As the bubbles pop at the top of the liquid, the sultanas go back to the bottom of the glass and the pattern repeats again.
Science Fun - Dancing Sultanas


We also placed some sultanas into a glass of plain tap water to see what would happen.  They just sank straight to the bottom of the glass.  My kids did noticed that there we some small bubbles on the sultanas but not enough to make them dance, float to the top of the glass.
 
Learning Opportunities
  • Using descriptive words to express ideas and opinions.
  • Make connections with real life experiences.
  • Promote scientific thinking – predictions, observations, comparison, reasoning, data gathering, experimentation and evaluation.
  • Cause and Effect
Find more Science Activities…..
Science Play
How to make Hanging Crystals?
Ice Boats – Floating and Sinking


Learning 4 kids

Imaginative Play Felt Pizza

How to make a felt pizza


Create an opportunity for your child to take on the role as a pizza chef and play creatively as they pretend make different pizzas using felt pizza toppings and other props.
It is amazing the wonderful creative ideas they will come up with as my kids made several pizzas faces, patterns using different felt toppings provided.
 
The great thing about making a felt pizza and toppings is that it becomes a toy that can be played with over and over again.  Our Felt Pizza is still played with on a regular basis and sits in the toy kitchen.
 
What you will need?
How to make a felt pizza


You will need a pizza box, cardboard, PVA craft glue, an array of coloured felt, pizza props such as tomatoe sauce bottle, spatula and food containers.  You will also need the printable pizza toppings sheet as a guide or template for making the different food toppings.
To make the pizza base I measured and cut a circle out of cardboard and glued cream coloured felt onto the board.  While I was waiting for this to dry, I cut out the different pizza toppings using the coloured felt sheets I had, tomatoe (red), pineapple and cheese (yellow), capsicum (green), ham (pink), mushrooms (brown), olives (black) and onion (white).
I also placed labels of the different pizza toppings on the bowls to encourage reading.
Click here to download and print: Printable Felt Pizza Toppings
 
 
Let’s Play
elt Pizza Imaginative Play


Pretending to squeeze on different flavoured sauces and using the spatular to spread the topping.
Imaginative Play Felt Pizza Topping 2


As my kids played I noticed that some of the pizza toppings made were sometimes random, others were placed more deliberately creating patterns.  Miss 2 loved to sprinkle all the toppings on from a great height.
Creating Pizza Patterns


Other fun things you can create with a felt pizza, patterns and pizza faces!   Note the red ribbon (tomatoe) in the hair of the pizza face, olives for eyes, mushroom nose with onion eye brows and smile and pineapple ears.
 
Learning Opportunities
  • It provides opportunities for children to identify with the adult world.  Practice and role play their understanding and interpretation.
  • Develop social skills: practising negotiation skills, turn taking and sharing. Provides opportunities for working out problems and experimenting with solutions.
  • Emotional development: Understanding and expressing their feelings through the re-enactment of certain experiences.  Taking on roles that encourage discipline and empathy.
  • Encourages imagination: Children can be anyone and do anything in the pretend world.
  • Develop language skills: practicing listening, looking and talking.  Being spoken to and talking with other people, also developing an understanding of what is being communicated through body language such as smiles and nodding.
  • Creativity, exploring with space and shape.
Find more activities & other ideas…..
Ice Cream Shop 8
Imaginative Play Ice Cream Shop
Imaginative Play Vet Hospital


Learning 4 kids
Related Posts Plugin for WordPress, Blogger...